Awhile back at the plant I work at we had a part wear out on a machine, the line was down and quite frankly we weren't sure just how to repair it to get the line running. The first attempt at fabricating a piece failed miserably , I thought about it awhile and started again, the machinist commented on how the first attempt didn't work and what made me think the second attempt would. My stress level was pretty high and I just stopped, "You never give up, never.....not even in the face of death". Now my comment got me some strange looks, but I proceeded to work and the second attempt was successful and looked promising.
When the part was done I gave a little story, a true one in fact.
I was walking down around the corner of the barn next to the manure pit one morning and I heard a noise that sounded like faint grunting and water splashing. I listened close for awhile and finally figured out that it was coming from a one foot diameter pipe that goes down in the ground about four feet to a valve for a manure transfer pipe. Now this pipe was about half full of water and looking in it there was a ground hog trying to stay afloat, and the way he looked he was about done for.
Now his predicament was dire but he kept trying to crawl up the pipe which was futile, but not to him. His primal little brain knew one thing and that was he wanted to get out of there.....to live, he wasn't about to give up. Now a ground hog is a real nuisance especially to a farmer, but I couldn't in good conscience let him just drown so I went to the shop and got a piece of pipe and made a hook. By the time I got back he was on his last leg, spending more time under the water than than on top. He came up again and I got the hook under him and got him out. He was whipped and walked slowly over to his hole and disappeared under the ground to live another day.
I covered the hole so it wouldn't happen again but for some reason I just found it somewhat inspiring that on his own he was done for but he kept trying.
One of my favorite quotes is by Winston Churchill on October 29, 1941, when he visited Harrow School.
" Never give in. Never, never, never, never--in nothing, great or small, large or petty--never give in, except to convictions of honor and good sense. Never yield to force. Never yield to the apparently overwhelming might of the enemy".
Stay safe
Bob
Nov 6, 2011
Aug 21, 2011
A Simple Wooden Spoon
It's been awhile since I've posted anything here, and I hope in the near future I'll be posting some worthwhile stuff but life is getting in the way.
I did make it to a little strip of woods and harvested some Bass Wood today for some carving and hearth boards. This is the first spoon I've carved in quite some time, in fact It's the first one I've carved green. I decided to try and leave the bark on.


I did give it a coat of flax seed oil hoping it doesn't dry out to quick and crack, and once it dries some I'll sand it more and coat it again.
Stay safe
Bob
Jul 10, 2011
Making a Paracord Bracelet , Part One The Lanyard Knot

Over at Bushcraft USA they have a Bushclass, one of the class electives was to make a cobra weave paracord bracelet. Now I'm not a knot tying genius and after getting through the first one it is quite easy and a lot of fun, giving you a convenient way to carry at least 8 feet or more of usable paracord on your wrist depending on the style. There are many different variations on how a bracelet is made with different weaves and buckles and knots, but this is the method I'm currently using as it is functional and simple.
As a picture is worth a thousand words I tried to set up the knots so that they can be done by following the different colored cordage in the order that I make them in with measurements of the cut pieces to minimize waste.
The Two cut lengths are
28" inches for the wrist lanyard
8' feet 2 1/2" for the cobra weave
Starting with the 28" piece you tie a lanyard knot in the end, I like this knot as it makes a nice looking round ball to use as the "button".


The free end of the paracord passes underneath the standing part forming an underhand loop.

The other end passes under the orange loop you've made, around the free end and goes over under over.
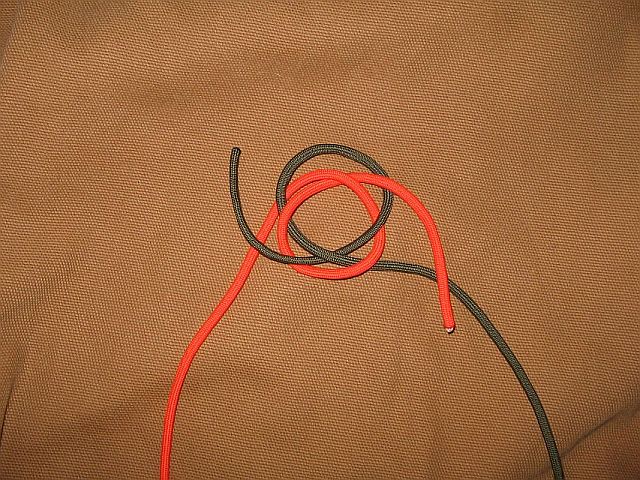
To make this easier I rotate the work slightly to get the free ends to pass over their opposite standing ends.

And up through the center.

This is the underside of the knot showing how the free ends come up through the center.

This is the finished knot, don't pull it up tight yet as it can be reworked to adjust to your wrist size.
Once you get the knot done you can adjust it to your wrist size by adjusting the strands of the knot, keep in mind that you want it a little large as some of the diameter is reduced by the cobra weave. I also make final adjustments after I'm finished with the cobra weave before pulling it tight

Part two, The Cobra Weave
Stay Safe
Bob
Making a Paracord Bracelet , Part Two The Cobra Weave
In Part One The lanyard Knot we started off with making the piece around the wrist.
Now that you have the wrist loop made and approximately sized you start your cobra weave with your 8 foot piece of cord.

I find it easier if you place a caribiner in the end of the loop, it give you a way to hold it and push the knots up against as you work.

Fold your 8 foot piece in half and you lanyard goes in between the two at the loop.

Take the top (green) over the orange.

And underneath your lanyard.

And up through the loop from behind.

It should look like this, pull this tight and push it against the caribiner.

The pencil points to the loop formed by your knot, this is the side you place on top of the lanyard.

The other end goes over top.

Underneath and up through the loop.

And the process alternates and repeats itself


As I work I try to keep the weave pushed up tight to the previous knots

Once I Have the cobra weave about half an inch away from the lanyard knot I try it on to check the fit, make any adjustments and tighten the lanyard knot.

I pull the last cobra weave knot tight and cut off the free ends leaving about 1/4" then melt it with a flame, I also trim and melt the free ends of the lanyard knot at this time. I usually wait a second or so before pushing the molten nylon against the bracelet.

I hope my tutorial is clear and with a little over 10 feet of paracord you can make your own, there are also many variations of weaves and tutorials on this subject on the internet and it is quite an addictive hobby once you get started.
Stay Safe
Bob
Jun 26, 2011
Charring and Using Natural Materials with Flint and Steel...Part 2
In part one I charred some punk wood by lighting it and stopping the burning process by smothering it in an air tight tin. I also wanted to try charring material in a tin on the fire much like charcloth is done.
Some of the materials I had along was some Ceder bark, Cattail down and some of the punk wood. All three materials I placed in an Altoids tin on the coals for about three minutes or so, I took it off the coals when the gasses escaping out from under the closed lid would burn for about thirty seconds or so and allowed them to cool.
Ceder bark

Cattail
 Punk wood

The finished product in the order above after cooling off.


I was able to strike and catch a spark in all three materials that I charred.While not quite as easy as catching a spark in charcloth it's not that difficult. The technique I used was to hold the steel stationary above the tin or fire box and strike down with the flint throwing the sparks downward into the charred material where it would catch and start to glow. I held my tinder (shredded Ceder bark) against the glowing material and blew on it until it caught and started to burn. Once lit I closed the lid saving it for future use.

Although I didn't try it you could take a piece of charred materiel and place it on the flint to catch a spark in the more traditional manner but I want to experiment more with this method to see if the firebox can be "fed" with small amounts of tinder to be self regenerating.
Stay safe
Bob
Some of the materials I had along was some Ceder bark, Cattail down and some of the punk wood. All three materials I placed in an Altoids tin on the coals for about three minutes or so, I took it off the coals when the gasses escaping out from under the closed lid would burn for about thirty seconds or so and allowed them to cool.
Ceder bark

Cattail


The finished product in the order above after cooling off.


I was able to strike and catch a spark in all three materials that I charred.While not quite as easy as catching a spark in charcloth it's not that difficult. The technique I used was to hold the steel stationary above the tin or fire box and strike down with the flint throwing the sparks downward into the charred material where it would catch and start to glow. I held my tinder (shredded Ceder bark) against the glowing material and blew on it until it caught and started to burn. Once lit I closed the lid saving it for future use.

Although I didn't try it you could take a piece of charred materiel and place it on the flint to catch a spark in the more traditional manner but I want to experiment more with this method to see if the firebox can be "fed" with small amounts of tinder to be self regenerating.
Stay safe
Bob
Jun 25, 2011
Charring and Using Natural Materials with Flint and Steel...Part 1
Ever since watching these excellent videos on the subject I've been meaning to give this a try, fact of the matter is as mentioned in the videos you probably wouldn't cut up your clothing for use in flint and steel fire lighting if it could be helped and our ancestors had an acute awareness of the natural world and how to make fire as their very existence depended on it.
Field Preparation Of Plant Tinder For Use With Flint & Steel By Charring
No Charcloth Flint & Steel Fire Lighting
I made the trip to my fire pit down at the creek taking along some natural materials and some tins to char them in. These materials I had on hand as I tend to gather and save tinder when I find it.
The first material I tried was some punk wood, I simply placed the material on the coals and once lit took it out and placed it in an air tight tin.


I removed the burning punk from the fire with some tongs made from a branch and placed them in a tin


After placing the burning punk in the tin I covered it and I allowed it to to cool before trying to throw a spark on it. After a couple of strikes it landed on a suitable spot and started to ember up.

Stay safe
Bob
Jun 10, 2011
Quick trip to the woods.
Between the farm weather and my job free time has been getting mighty scarce. Sunday we found some time to get to the woods plink with 22's and have some fun while getting a couple of Bushclass requirements done.
 Made some char cloth with an Altoids tin, I did not put a hole in the lid after thinking there would be enough of an air gap around the lid and it seems to work.


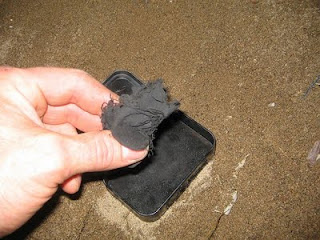
It seemed to work well!
Also we made some plain Bisquick bread or bannock.


The pot hook method did not work so well so I ended up putting it in the coals. All in all I was pretty happy with the outcome and made me wish we would have made some stew to go with it.
Enjoying the fruits of our labor.
Stay safe
Bob
 Made some char cloth with an Altoids tin, I did not put a hole in the lid after thinking there would be enough of an air gap around the lid and it seems to work.


It seemed to work well!
Also we made some plain Bisquick bread or bannock.


The pot hook method did not work so well so I ended up putting it in the coals. All in all I was pretty happy with the outcome and made me wish we would have made some stew to go with it.
Enjoying the fruits of our labor.

Stay safe
Bob
Subscribe to:
Posts (Atom)